Download
Download this file as Jupyter notebook: recording_results.ipynb.
Example: Recording Results
To begin, we initialize a 3-qubit circuit. It is important that we add three measurement operations to the circuit because the total number of measurement operations dictates the length of bitstrings that are allowed by the circuit.
[2]:
import trueq as tq

circuit = tq.Circuit({(0, 1): tq.Gate.cz, (2,): tq.Gate.x})
circuit.measure_all()
circuit
[2]:
|
Circuit
|
|||
|
|
(0, 1):
Gate.cz
|
(2):
Gate.x
|
|
|
1
|
(0):
Meas()
|
(1):
Meas()
|
(2):
Meas()
|
We can manually set the value of results with anything dict-like. This is cast to
a Results object when stored in the circuit.
The order of the bits in the bitstring, from left to right, corresponds to the order of the measurement operations in the circuit with respect to sorted qubit labels. Thus the left-most bit in “011” corresponds to the measurement of qubit 0 in this example.
[3]:
circuit.results = {"011": 5, "101": 15}
circuit.results
[3]:
Results({'011': 5, '101': 15})
The results object has many convenience methods. For example, we can add the “111” result and print the updated results. circuit.results[“111”] = 10 circuit.results
Increment the “111” result and print the updated results.
[4]:
circuit.results["111"] += 5
circuit.results
[4]:
Results({'011': 5, '101': 15, '111': 5})
Add multiple results and print.
[5]:
circuit.results += {"010": 1, "110": 10}
circuit.results
[5]:
Results({'011': 5, '101': 15, '111': 5, '010': 1, '110': 10})
Bitstrings can be replaced by their decimal equivalent.
[6]:
circuit.results += {3: 1, 6: 10}
circuit.results
[6]:
Results({'011': 6, '101': 15, '111': 5, '010': 1, '110': 20})
Results can also be set by passing vectors of the correct size.
[7]:
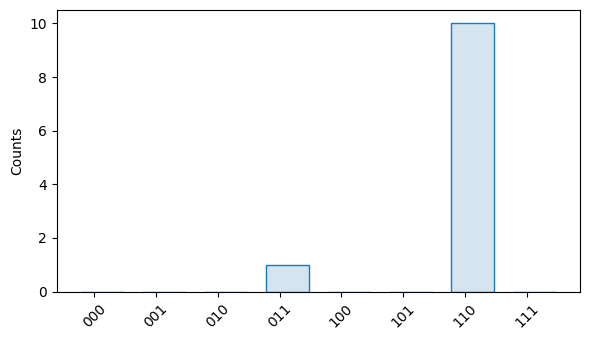
circuit.results.from_vec([0, 0, 0, 1, 0, 0, 10, 0])
circuit.results.vec
[7]:
array([ 0, 0, 0, 1, 0, 0, 10, 0])
Here, we display the results entered so far as a bar plot.
[8]:
circuit.results.plot()

Download
Download this file as Jupyter notebook: recording_results.ipynb.
